Thursday 28 February 2013

Rainbow Jelly Cups 彩虹啫喱杯

This rainbow jelly cups were made for my daughter's classroom birthday celebration today! Unfortunately she was sick and had the leave school early, her classroom birthday celebration was cancelled.

I had 6 colours with a layer of milk layer in between each layer. Thererfore, it has a total of 11 layers. The red colour does not comes out nicely, I will add a bit of red food colour to it next time. I used shooters disposal cups (3oz). It can made around 30 cups.


Just follow the directions of the jello package. Reserved 1/3 of the prepared jelly and mix with 1 tbsp of condensed milk for the milky layer. You can skip this if you don't want this layer. But I can tell you the colour will stand up more nicely if you put a white layer in between each colour. In this photo you will see I did not put the white layer between red and orange (because the cup is already full).
You will need to take at least 20 minutes for each layer to settle in refrigerator. Therefore, allow half a day to a day to make this. You cannot do that in rush. For example 11 layers, 11 x 20 mins = Nearly 4 hours.

It is better to add some red food colour to the red layer to stand out between orange and red.

Monkey Chocolate Cupcakes 猴子朱古力小蛋糕

This year my younger daughter's birthday theme is Monkey/Gorilla. After the monkey gorilla bithday cake, here comes Monkey Chocolate Cupcakes for her Grade 1 class celebration on the real birthday day! That is today!


Chocolate Cupcakes Recipe:
Source from: http://www.ricardocuisine.com/recipes/3555-basic-chocolate-cupcakes

Basic chocolate cupcakes

Preparation time: 20 min
Cooking time: 25 min

- 375 ml (1 1/2 cups) unbleached all-purpose flour
- 7.5 ml (1 1/2 teaspoon) baking powder
- 2.5 ml (1/2 teaspoon) baking soda
- 1 ml (1/4 teaspoon) salt
- 250 ml (1 cup) sugar
- 180 ml (3/4 cup) cocoa
- 180 ml (3/4 cup) vegetable oil
- 2 eggs
- 5 ml (1 teaspoon) vanilla extract
- 250 ml (1 cup) milk

Preparation
1. With the rack in middle position, preheat the oven to 180 °C (350 °F). Line a 12 cavity muffin tray with paper liners.
2. In a bowl, combine the flour, baking powder, baking soda and salt. Set aside.
3. In another bowl, combine the sugar and cocoa. Add the oil, eggs, vanilla and beat with an electric mixer at high speed or until mixture is smooth. At low speed, add the dry ingredients alternately with the milk. Scoop the batter into the molds.
4. Bake for approximately 25 minutes or until a toothpick inserted in the center of a cake comes out clean. Cool and store in an airtight container.
TipsThis recipe for chocolate cupcakes can yield 12 to 14 cakes. If you have a 12 cavity mold, know that the batter can safely wait before being baked


These are the labels I made for packaging the cupcakes individually for my daughter's classmates after class birthday celebration. Unfortunately my daughter was sick after recess and had to leave school early. The class celebration was cancelled. Since all the cupcakes were packed and ready to give out, I left the cupcakes to her homeroom teacher so that she can helped me to distribute to the class before school dismissal.

Wednesday 27 February 2013

Monkey cake 猴子蛋糕

Coming Thursday is my younger daughter's 7th birthday. We have an early birthday celebration with her at home inviting some friends over to eat and chat. She requested a cake with Monkeys and Gorilla. Yes, 2 specific kinds of animal on the cake top. And she wanted them to be seated on some grass. Also, she wanted a chocolate cake. She is a person who well know what she needs. She gave me very clear picture of what she wanted for her birthday cake. Therefore, I made her a black forest cake with a layer of cream of black current jello.


Thursday 21 February 2013

Japanese style Seared Ahi Tuna


Today I went to US costco for our monthly big grocery shopping. We found this fresh Ahi Tuna.
We bought a pack of Ahi Tuna steak weigh 1.10lbs for $14.29. Not bad at all. It costs a lot more if I buy from Granville Island.


I originally want to seared it with black and white sesame. But I found out I don't have any black sesame at home. I got Japanese chilli pepper powder mix 七味紛 and white sesame at home. Therefore, I decided to cook it in Japanese way!

Ingredients:
Japanese red pepper powder mix  七味紛
ground coriander seed (to add lemon flavour)
Salt
Roasted Black and white sesame
some soya sauce

Sauce: Ponzu sauce with minced ginger or wasabi

For one steak (1/2 lbs). I use around 1/2 tsp (for 2 sides, that means 1/4 tsp for one side) of red pepper powder (you can decrease the amount if you don't want it too spicy), 1 tsp salt (for 2 sides), 2 tbsp (for 2 sides) white sesame (you can add black sesame if you have some) and 1 tsp (for 2 sides) ground coriander seed powder. Mix them well and place on a plate. Put steak on the powder mix and press the steak until it coated with the powder mix. Do it on both side.

Heat pan with oil. In medium heat, seared Ahi tuna. Around 1 minute for each side. If you don't want to be very raw, seared it in long time.

When serving, cut in thin slices. Pour some soya sauce over the Ahi tuna steak. Minced some ginger and mix with some Ponzu sauce. You can either serve it with wasabi or ponzu sauce.

Tuesday 19 February 2013

Flower birthday cake

This is a cake for my friend's colleague's birthday! She wants me to make her a flower rectangle basic yellow cream cake! This cake is 9"x13" yellow cake with whipped cream frosting! Decorative flowers are made with buttercream icing.

Sea Urchin (Uni) 海膽


It's season again! I saw there are 2-3 boats at Steveston Fishermen Wharf, Richmond, BC that are selling live fresh whole sea urchin every weekend! We bought 3 big one last weekend ($10/3) and served in 2 kind of dishes - Uni sashimi and steamed egg with uni (for my daughters).


How to open a sea urchin:

  • Use thick rubber gloves or use a tongs to hold the sea urchin. Cut around the top of the sea urchin's shell using kitchen shears. Make cuts toward the outer edge of the sea urchin to expose the flesh. Drain off the liquor (the liquid found in shellfish) and remove the viscera (organs)


  • spoon out the sea urchin roe by a spoon from inside of the shell. The shell contains five pair of roe, each contained inside a thin membrane. Do not the break roe. Rinse the roe in cool salted water to remove any remaining liquor, and drain. Place it on paper towel and it can be keep in refrigerator for up to 2 days!

  • This is a video I found from youtube to show you how to clean a live sea urchin:


    Wednesday 13 February 2013

    Valentine's Heart Shape Italian Macarons 心形馬卡龍

    It is Valentine's Day tomorrow! And I am free today! No need to prepare kids' Chinese School dictation and no school quizzes tomorrow. I decided to make myself and for my friends Heart Shape Red Italian Macarons. I've made macarons few times before so I won't repeat the recipe again. Please refer to make previous blog entries: http://winniemsfong.blogspot.com/2012/05/perfect-italian-macarons.html In the recipe, I add red colour and rose essence to the batter to make Rose Red Heart shape macarons! I piped a "V" shape on the baking sheet to make a heart shape macaron!


    盆菜 Chinese New Year Big Bowl Pot


    Serves 25 people. Serve with heating over portable propane gas stove.
     
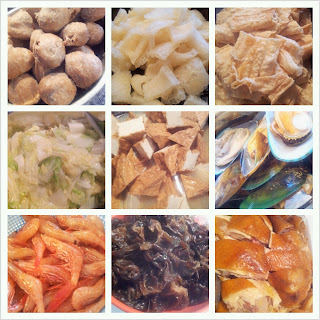
    HAPPY CHINESE NEW YEAR TO EVERYONE! This year Chinese New Year (Year of Dragon). I made this for our CNY gathering party (正正年初一) ! I bought a really big pot (15" diameter) for this Big Bowl Pot! I put in 17 kinds of ingredients. Dried Mushroom, dried conches and dried scallop needed to be soak in water overnight 2 nights before (Fri night). Then I steamed them on Saturday. So that I can just put them to the pot on Sunday before the party dinner. For the dried scallop, you need to soak in water for a while and then pan fried them with wine, ginger and onion first. Then add chick soup to stew (炆) them with conches and black mosses for around half an hour.

    Diagram for putting ingredients to the pot in layers.
    When I cut the King Oyster Mushroom, I sliced it in very thin slice to try to look like abalone pieces. When I cook it, I put some abalone sauce to it and it looks like real abalone!! And tastes like abalone! But of course the texture is very different from a real one!
    Soup base:
    Before heating up on stove, pour soup to the pot and let it boil before serves.
    Ingredients for the soup base: 柱候醬 Chu Hou Sauce,蚝油Oyster sauce,鹽Salt,雞湯Chicken broth,糖sugar,生抽Light soya sauce,老抽少許Dark soya sauce,花彫酒Cooking wine調配成盆菜汁. I use around 8 cups of chicken broth for this big pot. The measurements are really depend on how big the pot is. And you can adjust to taste.


    Add caption
    
    17 ingredients included:
    Top layer:
    油雞 Soya Chicken
    燒肉 Roast Pork
    海蝦 Shrimp
    青口 Mussel
    蠔豉 Dried oyster
    鮑魚菇 (雞脾菇)King Oyster Mushroom
    響螺  Dried Conches
    瑤柱  Dried scallop

    
    I put a seperator on the bottom of pot to prevent food burn/sticking
    
    Middle layer:
    發菜 Black Moss
    雲耳  woodear Fungus
    肉丸 Meat balls
    炸豆腐 Deep Fried Tofu
    冬菇 Dried Mushroom

    Lower layer:
    豬皮 Pig skin
    炸枝竹 Deep Fried Tofu skin
    蘿蔔 White Raddish
    短紹菜 Veggies


    Tuesday 12 February 2013

    Tofu (Tofu fa) Pudding 豆腐花

    When I looked into people's blogs and recipes, everyone said it is 100% successful and very easy to make. But let me tell you, this is the only dessert that make my really frustrated. I think I made it at least 4 times to be successful. I use different recipes with different containers. Finally, I found out I need to use more Gypsum Powder and a container that can store heat. I like to eat hot Tofu Fa. It is a good idea to use rice cooker to make this.


     Prepare and cook time: 45 mins.(Including waiting time)
    (Serve 2-3)

    Ingredients:
    2 cups (500ml) Soya Milk 豆漿(unsweetened)
    1 tsp Gypsum powder 熟石膏粉
    1 tsp Corn Starch 生粉
    100 ml soya milk豆漿


    Directions:
    Step 1: Pour 2 cups (500ml) of soya milk (sweetened or unsweetened) in a pot and bring to a boil.
    先把豆漿倒在深鍋中,用中慢火煮到大滾

    Step 2: Dissolve 1 teaspoon of Gypsum powder (熟石膏粉) and 1 teaspoons of corn starch with 100ml of soya milk.
    煮豆漿期間,在100ml豆漿中放入石膏粉和一級生粉,拌勻

    Step 3: Quickly pour all the boiled soya milk on one hand and pour the powder mixture on the other hand into the container at the same time slowly. Cover the pot with kitchen towel with lids and let it sit at room temperature for 30-45 minutes without stirring it or touching it until the center of mixture is not runny.
     當豆漿大滾時,把預備好的石膏粉和生粉水倒進盛豆腐花的大碗中,切勿讓石膏粉沉底。倒完豆漿後,用一塊清潔布蓋面,然後蓋上碗蓋。等候30至45分鐘,讓豆漿凝結成為豆腐花

    I use rice cooker to make it this time. It can keep it warm too. The photo on the right is making ginger brown sugar syrup.
    Tofu Fa can be served with brown sugar or ginger brown sugar syrup. It can served hot or cold.
     用少許水把黑糖煮溶,淋入豆腐花中享用。


    Thursday 7 February 2013

    Dried Oysters with Roast Pork and Black Moss鮑魚蠔豉髮菜炆冬菇火煵

    Recipe from: http://dev.eastweek.com.hk/index.php?aid=5496
    Chinese New Year is coming in just a few days. I will be make "Big Bowl Pot" 盆菜 for our CNY dinner party. Therefore, I made this as a trial and also made this as family new year celebration dish for my family. My girls love black moss and dried oyster. And this is my husband's favourite new year dish. I added roast port and canned abalone to the recipe.


    髮菜煮法 Preparing the black moss:

    材料 Ingredients
    髮菜  15克 15g black moss
    生粉 (清洗髮菜用 ) 1湯匙+油1湯匙 1 tbsp cornstarch+1 tbsp oil for cleaning
    1茶匙 1 tsp salt
    1茶匙 1 tsp sugar
    2茶匙 2 tsp wine
    雞湯  1/2杯 1/2 cup chicken stock
    1湯匙 1 tbsp oil
    浸髮菜方法/Preparing the black moss

    1. 髮菜放入一大碗水中,浸泡一個早上,待髮菜的雜質沉澱,然後瀝乾。用1湯匙生粉及1湯匙油洗擦髮菜。
    Soak the black moss in plenty of cold water for one morining to allow sand and soil to sink into the bottom of the bowl, Drain the black moss. Now rub 1 tbsp cornstarch and 1 tbsp oil into the black moss. 
    2. .然後將髮菜過水,需要換水重複清洗數次,盡可能把髮菜的雜質洗掉。擠乾髮菜,碗底會留有細小沙泥。
    Rinse the black moss in several changes of water, removing as much of the impurities as possible. Squeeze dry the black moss. There will be fine sand at the bottom of the bowl.
    3. 髮菜以鹽、糖、酒、雞湯和油調味。
    Season the black moss with salt, sugar, wine, chicken stock and oil.
    4. 用錫紙蓋好,隔水蒸半小時,備用
    Cover with aluminium foil and steam for 1/2 hour. Set aside the steamed black moss.

    蠔豉煮法/Preparing the semi-dried oysters

    材料
    材料   Ingredients
    日本大蠔豉 12隻 12 large Japanese-dried oysters
    中型冬菇(浸透) 18隻 18 Chinese mushrooms, medium size, soaked
    燒豬腩(起肉,切成長塊) 400克 400g roast belly pork, rib bones removed and cut into rectangular pieces
    乾瑤柱(蒸熟後拆散) 1/4杯 1/4 cup dried scallop ,steamed and shredded 
    唐生菜 500克 500g Chinese lettuce
    3至4片 3-4 pieces ginger
    葱段 3至4條 3-4 sprigs spring onion
    油(煎蠔豉用) 1湯匙 1 tbsp oil for searing
         
    蠔豉醃料   Oyster Marinade
    1/2茶匙 1/2 tsp salt
    1茶匙 1 tsp sugar
    薑汁 1茶匙 1 tsp ginger juice
    紹興酒 1湯匙 1 tbsp Chinese Shaoxing wine
    生粉 1茶匙 1 tsp cornstarch
    1湯匙 1 tbsp oil
         
    煨蠔豉汁  Braising seasoning
    雞湯 1杯 1 cup chicken stock
     1杯 1 cup water
    蠔油 1湯匙 1 tbsp oyster sauce
    老抽 1湯匙 1 tbsp dark soya sauce
    1茶匙 1 tsp sugar
    1/4茶匙 1/4 tsp salt
    紹興酒  1湯匙 1 tbsp Chinese Shaoxing wine
    玫瑰露酒 1茶匙 1 tsp rose wine
    麻油 1茶匙 1 tsp sesame oil
         
    芡料   Cornstarch mixture
    生粉  2茶匙 2 tsp cornstarch
     2湯匙  2 tbsp water
    1. 蠔豉浸凍水10分鐘至軟身,然後用手指擦掉蠔豉污垢和沙泥。除去較硬部分,棄掉。用清水沖洗,再用乾淨布塊將蠔豉徹底擦乾。
    Soak the dried oysters in cold water for 10 minutes, then rub gently with your fingers to get rid of dirt and sand. Remove and discard the hard muscles. Rinse well with water, drain and dry thoroughly with a clean towel.

    2. 用鹽、糖、薑汁、酒、生粉和油醃勻。
    Marinate the oysters with salt, sugar, ginger, juice, wine, cornstarch and oil.
    .
    3.燒熱一平底煎鍋,加1湯匙油燒滾,爆香薑片和葱段。放入蠔豉煎至金黃。
    Heat up a heavy, flat-bottomed frying pan, add 1 tbsp oil, and when hot, fry the ginger and spring onion until fragrant. Now sear the dried oysters in this oil until golden brown.

    4. 灒下兩種酒(紹興酒和玫瑰露),然後注入雞湯和水。將蠔豉和湯汁置入燜鍋中。
    Sizzle in the two types of wine(Shaoxing and rose wine), then splash in the chicken stock and water.Transfer the oysters and sauce into a braising pan.

    5. 加入乾瑤柱絲,再放蠔油、老抽、糖和鹽調味。滾起後收細火,加蓋燜1小時,中途視乎情況添加水分。
    Add the shredded dry scallop, and season with oyster sauce, dark soya sauce, sugar and salt. Bring to a boil, lower the heat to a fast simmer, covered, for 1 hour, replenish with water if necessary.

    6. 加入燒豬腩肉和冬菇,一起和蠔豉再燜半小時。中途視乎情況添加水分。燜完要有1杯肉汁剩餘。濾出肉汁備用。
    Add the roast belly pork pieces, mushrooms and continue to braise with the oyster for 30 minutes; add more liquid if necessary, make sure there remains 1 cup of liquid at the end of cooking. Drain the sauce and set aside.

    7.將蠔豉排放在一深碗底部,上放一層燒肉,再放冬菇,最後是髮菜,淋上之前濾出的肉汁,隔水蒸20分鐘。
    Arrange oysters at the bottom of a deep bowl, then a layer of roast pork, a layer of mushrooms and finally cover with dark moss. Pour the drained sauce into the bowl and steam for 20 minutes.

    8. 與此同時,用加入少許鹽、糖、酒及油的滾水,將唐生菜灼熟,瀝乾備用。
    In the meantime blanch the Chinese lettuce in boiling water with a pinch of salt, sugar, wine and oil. Drain and set aside.

    9. 蠔豉蒸至腍身後,將汁倒進鑊裏煮滾,並加入芡料煮至濃稠。灒麻油。
    After the oysters and steamed soft, drain the sauce from the steamed bowl into a wok. Bring the sauce to boil and thicken with cornstarch mixture. Sizzle in sesame oil.

    10.取一隻大碟倒轉放在盛着蠔豉和冬菇等材料的大碗上面,緊握碗和碟,將整道菜倒扣在碟上,移走大碗。
    Place a plate over the bowl and invert the oysters, mushrooms etc. onto the plate. Be sure to hold the plate and bowl firmly together. Lift and remove the bowl.

    11. 將唐生菜圍飾在盛蠔豉的碟邊,把醬汁淋在蠔豉上即成。
    Arrange lettuce attactively around the oysters. Pour the sauce over it and serve!

    小貼士

    如想冬菇食味更佳,將之與蠔豉一同煨煮前,可先按照以下程序處理:冬菇洗淨及浸軟後,拌入冰糖1茶匙、生抽1茶匙和油2茶匙,並加入隔濾過的浸冬菇水、生粉1茶匙,以錫紙封口,隔水用大火蒸45分鐘。

    The soaked mushrooms taste better if the following procedures are applied before braising with the oysters : After soaked and washed the mushroom, steam the mushrooms in the strained mushroom water with 1 tsp rock sugar, 1 tsp light soya sauce, 2 tsp oil and 1 tsp cornstarch. Cover with aluminium foil. Steam for 45 minutes with high heat.

    Tuesday 5 February 2013

    Korean Citron (Pomelo) Tea Cheesecake 韓國柚子茶芝士蛋糕

    7" cake


    Cake base Ingredients:
    150g Graham (Marie) biscuits
    60g melted butter

    Cheese Batter ingredients:
    250g cream cheese
    3 tbsp sugar
    1 tbsp lemon juice
    1 tbsp gelatine
    3 tbsp water
    60 ml milk
    3/4 cup whipping cream
    3 tbsp Korean Citron Tea

    Toppings ingredients
    whipping cream
    2 tbsp Korean Citron tea
    1 tsp gelatine
    2 tsp water

    Method
    1. Crush graham biscuits. Stir in melted butter. Press the mixture hard into a 18 cm (7") round cake pan lined with baking paper
    2. To make the cheese batter, whisk whipping cream until stiff. Heat gelatine and water over a hot water bath and stir until gelatine dissolves completely.
    3. Whisk cream cheese until smooth. Add in sugar and stir for a while. Then add milk and mix well.
    4. Add lemon juice, citron tea and gelatine solution from step 2 a little at a time. Mix well after each addition.
    5. Fold in whipped cream. Pour the batter on the cake base. Refrigerate for 4 hours until set.
    6. To make the topping, heat the gelatine and water over a hot water bath. Stir until gelatine completely dissolves. Stir in citron tea. Spread it at the centre of the cake. Decorate with whipped cream. Refrigerate the cake for a while. Serve.
    Tips: The Citron (pomelo) stips in the citron tea are quite chunky. They tend to make the cuts less neat and tidy when you cut the cake into slices. You may finely chop the citron (Pomelo) strips before use for neater cuts.
    This is just a random stock photo of Citron Tea. Just pick one in any brand


    Cake in slice. Photo was taken by a  friend

    Recipe from: Healthy and Fabulous Desserts book

    Turnip (Raddish) Cake 蘿蔔糕

    Chinese new year is coming soon! Although I am sick, I still think I will need to make one before CNY. This is the first time making that but it was a successful! My kids and husband love it!


    Ingredients: Made 5 (7" round container)
    3 lbs (1.5kg) Turnips 白蘿蔔
    1 lb (450g) rice flour 粘米粉
    3 cup (75g) ungluten flour澄麵粉
    8 Chinese mushrooms冬菇
    2 oz (50g) dried shrimp蝦米
    6 oz (175g)  Chinese sausage and preserved pork臘腸臘肉
    6 cups water

    Seasonings:
    3 tsp sea salt
    1 tsp chicken bouillon powder (optional)
    2 tsp sugar
    Dash of sesame oil
    pinch of pepper

    Garnish:
    Dash of parsley, green onion and white sesame


    Method:
    1 Soak and dice the Chinese mushrooms. Clean and soak the dried shrimp. Steam the Chinese sausage and preserved pork, dice.

    2. Sieve rice flour and ungluten flour together into a large bowl, add seasonings, add 3 cups of water to form a batter.

    3. Saute diced ingredients in oil. Sizzle in wiine, sit well, Dish.

    4. Peel and grate turnips into long shreds. Use a big wok/pot, add with a little oil, add turnips with 3 cups of boiling water, bring turnips to boil, immediately pour mixture into the batter, sitr to obtain a sticky consistency. Add other ingredients, mix well.

    5. Pour pudding mixture into a greased tin. Steam over high heat for 1 hour until cooked.

    6 Garnish, cool, slice and shallow fry until it turns to golden brown in colour on both sides.


    Tips: Texture of pudding can be adjusted according to one's desire. For a firmer texture, add a little more rice flour or use less turnips. Choices of assorted meat can be optional.

    Monday 4 February 2013

    Taro Tapioca Coconut Sweet Soup 椰汁芋頭西米糖水


    材料: 
    芋頭  半個       
    西米  60g       
    椰汁  1罐 (小)  165ml       
    鮮奶  165ml       
    水  4碗 (1L)      
    冰糖  適量 


    烹調步驟:
    (1)    煲滾水, 水量是西米的4倍 (最少, 份量外), 下西米煮5分鐘
    (2)    蓋上煲蓋, 焗約10分鐘至西米變透明
    (3)    隔去水份, 用開水冲洗至涼透, 瀝乾水份
    (4)    芋頭切小粒
    (5)    煲滾水, 下芋頭粒大火煮15分鐘
    (6)    蓋上煲蓋, 熄火焗15分鐘至腍
    (7)    大火煲滾芋頭, 下冰糖調味
    (8)    加入椰汁, 鮮奶和西米, 滾起即成 

    小貼士: (1)    由於煮西米和芋頭的時間不一樣, 一定要分開煮, 才可確保芋頭夠腍, 西米又夠煙靱.
    (2)    煮西米一定要用焗法, 這樣才可保持煙靱.
    (3)    煮芋頭也要用焗, 否則芋頭會煮得爛爛, 不夠火又不會腍.
    (4)    不喜歡椰汁的話可用鮮奶或花奶代替.
    (5)    雪凍吃味道更佳.

    Recipe source: http://shirleyliving.mysinablog.com/index.php?op=ViewArticle&articleId=1303146