Thursday 28 August 2014

White wine Clam fresh from the beach (Clam digging picnic lunch) 美國半天掘蜆野餐旅遊


August 26, 2014: This is the last week of Summer before school starts. And we planned to have a clam digging trip since the first day of summer holiday way back in June. The closest clam digging beach is Birch Bay at Blaine in Washington state just across the border from Vancouver Canada. There was a red tide/biotoxin warning since the first day of summer break until Aug 21. Finally we can go and have our first time clam digging experience with kids before school starts. It is only an hour travel time from Richmond, Canada to Birch Bay, Blaine US if you have a NEXUS card (like us) to save border waiting time. 

To check for Red Tide warning and Washington state shellfish harvest area, you can go to their Shellfish Safety Map Website: https://fortress.wa.gov/doh/eh/maps/biotoxin/biotoxin.html

 For tide table in Blaine, Washington: http://www.dairiki.org/tides/monthly.php/bln

Tide predictions for other areas in Washington state: http://tidesandcurrents.noaa.gov/tide_predictions.html?gid=259#listing

For non US resident, one day shellfish license is $20.15. My friend told me that annual pass is just $35 and you can go unlimited clam digging all year round in any State of Washington beaches. Kids under 15 also need a license but it is free. 

Clams are located 4-5 inches deep down from this rocky beach. You will need a big shovel for faster and easier harvest.

There are restrictions on bringing live and raw shellfishes back into Canada, therefore we brought a BBQ stove and a Hotpot stove for cooking our harvest on site.

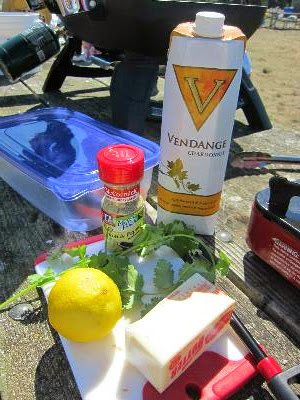
We went to Bay Centre Market for shellfish license and also some food for BBQ and ingredients for cooking clams. We bought wiener sausage and a loaf of garlic bread. For cooking the clams, we bought butter, white wine, lemon, lemon and pepper seasoning, and cilantro. I prefer dill but they don't have any fresh herbs except Cilantro. It is better to have garlic too. Unfortunately I cannot find any in the market :(

Today's low tide happened at 12:34 PM.  Perfect time to catch some clams for lunch. We did not dig many because we did not bring proper tools. We only brought some gardening tools and it takes longer time to find good number of clams. Next time we will bring a bigger shovel for more and easier harvest. 

We also grill portions of our harvest. It tasted good too!

Birch Bay State park has washrooms, picnic tables and water all along the beach. It is very convenient.  We wash the clams there and put the clams in bucket of clean water. Leave it for half an hour and let them have enough time to spill out the sands.


We got 3 kinds of clams and a few mussels there. Cockle Clams taste the best. But the Manilla Littleneck and butter clams are also delicious.


Ingredients:
White wine
Butter
Lemon
Lemon and Pepper seasonings
Garlic (But I cannot find that in market)
Cilantro or dill

Directions:
 Prepare a pot, melt the butter
Sauteed crushed or minced garlic
Put in clams and stir
Pour in White wine, add lemon and cilantro/dill.
 Covered until white wine boiled.
Open cover and stir the clams. Cover again and turn to medium heat.
Served when clams are cooked and opened up.



Sunday 17 August 2014

How to clean and cut Live Sea Urchin 如何清潔和切活海膽

At Richmond Steveston Fisherman Wharf, we love to buy fresh prawn and live sea urchin there. We can buy live sea urchin at price $10 for 3. The price did not raise over the last few years. My first Sea Urchin blog post was in year 2011. Second one is year 2013. Last one posted in year 2014 (Scramble eggs with sea urchin). Usually it is hard to have all three perfect one. Some of the uni are dark yellow colour with some dark spots (Pic B). Some perfect ones are orange just like the title picture of this blog. This time I got 2 out of 3 that are perfect orange colour. Not bad. Here I would like to post again the procedure of cleaning an sea urchin.


How to clean live sea urchin (pic 1)?
  • Prepare a bowl of sea salt water. Around 1L of water + 1/2 tbsp sea salt. (Pic 2)
  • Please wear thick rubber gloves, you will also need a pair of scissors and a spoon. (Pic 3)
1. Take a large knife or thick scissors and cut a hole around the X (the mouth). (Pic 4)
2.  Carefully separate the pieces of shell. Take the X (mouth) out and shake out all the guts, dirty stuffs and water. (Pic 5)
3.  If you cannot scoop the uni out from the hole. You can try to break the shell but pulling them in half from the hole toward outside (Pic 6). Scoop the extract the pieces of yellow or orange Uni by spoon (pic 7).
4.  Pick all guts and bits of partially digested seaweed off the Uni. (Pic A)
5.  Take each piece of Uni and individually wash each one very gently in the salt water***.(Pic B)
7.  Dry them by placing the Uni on paper towel (Pic 8)
8. Serve


The photo on the right is an example of bad grade of uni meat.

*** must wash with Sea Salt water. Place it on paper towel and you can keep it fresh in fridge for one or two days fresh! If you rinse it under normal tap water, the Uni will melt and become watery.

Blueberry Cheesecake Ice cream 藍莓芝士雪糕

From my previous blog post, I already mentioned that we had blueberries u-pick with my friends last week. I made Blueberry Jam for bread spread by using the fresh u-pick blueberries. Please refer to my Blueberry jam blog post for recipe. And here I use the blueberry jam to make blueberry cheesecake ice cream.


Recipe:

Ingredients

  • 1 (8-ounce) package cream cheese, softened
  • 1 cups whole milk
  • 5 tbsp condensed milk
  • 1 cup whipping cream
  • 1 1/2 teaspoon vanilla extract
  • 1/8 teaspoon salt
  • 1 cup fresh blueberries jam (you can also add whole blueberry to ice cream if you wish)
  • 2 teaspoons lemon zest (optional)

Instructions

  1. Process the first 6 ingredients in a blender until smooth. Cover and chill for at least 2 hours.
  2. Pour mixture into the container of an electric ice cream maker and process according to the manufacturer's instructions. Mine usually churns about 25 minutes.
  3. While the ice cream is churning, add the blueberries jam and lemon zest (and whole blueberries if you want) during the last few minutes of churning.(If you add whole blueberries, mash them a little bit before adding to ice cream mixture).
  4. Place churned ice cream into a freezer-safe, lidded container, and freeze for an hour prior to serving.


Recipe adapted from Kitchen Meets Girl Website

Friday 15 August 2014

Simple Blueberry Jam 藍莓果醬

Last week, my friends visited us from Hong Kong and they were staying with us for a week. I planned their travel itineraries and here comes our first local activity. The first activity that we introduced them was U-pick blueberries and Strawberries. We have a couple of berries farms in our neighborhood that offer U-pick berries. It is a very fun activity to family especially with kids. We picked altogether 6 pounds of Blueberries and Strawberries (pic 1). I washed them and dry them with napkins(pic 2). I frozen most of it and kept some for making blueberry jam. Here is a simple small batch recipe that I found in website.


Easy Blueberry Jam {Small Batch Recipe}

This is a small batch of jam, making about 2½ cups.
Ingredients
Supplies:
  • wide saucepan or skillet (I like to use a skillet)
  • potato masher
  • spatula or spoon
  • hand blender
Ingredients:
  • 2 lbs blueberries, about 6 heaping cups
  • 1½ cups sugar
  • pinch of salt
Instructions
  1. Prepare your jars by boiling the lids, rings and jars in boiling water for 5 minutes.
  2. In a wide saucepan or skillet on low-medium heat, add the blueberries, pinch of salt and sugar(pic 3).
  3. Stir to combine.
  4. Then use your potato masher to smash up the blueberries and release their juices(pic 4).
  5. Turn up the heat to medium, then cook the blueberry mixture until it is gently boiling.
  6. Keep cooking, and stirring until the mixture thickens. You must, must stir constantly or your jam will burn. As well the constant stirring will help to prevent the jam from splattering out of the pan. You will likely need to cook the jam for 30 or more minutes.
  7. You will know that the jam is ready when the mixture is thick enough to leave an open trail behind the spoon.
  8. Remove from heat, and let cool completely before serving.
Notes
This jam can be refrigerated for up to 4 weeks you don’t really need to seal the jars.
Recipe source:  http://www.aprettylifeinthesuburbs.com/easy-blueberry-jam-2-ingredients/