Thursday, 24 November 2016

Oolong Lychee Jelly Cup 烏龍茶荔枝凍


Oolong Lychee jelly cup烏龍茶荔枝凍. Extremely easy dessert with only 5 ingredients: Oolong tea, water, sugar, Lychee meat, and Agar Agar powder. (Optional: Served with evaporated milk )  

Ingredients:

6  Oolong Tea bags
750 L + 200L Water
2 tsp Agar agar Powder
100g sugar 
evaporated milk (Optional)

Directions:

  1. Bring 750L water to boil, immerse oolong tea bags to water. Turn off heat and immerse for 5-7 minutes.
  2. Squeeze water out from tea bags. Set aside.
  3. Use another saucepan, combine agar agar powder with 200L cold water. 
  4. Stir and turn on heat to high.
  5. Take it to full boil and keep stirring for about 5 minutes.
  6. Keep boiling until all agar agar dissolved. Pour tea into boiling agar agar water.
  7. Add sugar and stir until all sugar dissolved. 
  8. Pour tea jelly liquid to mold or container. Cut Lychee into small pieces.
  9. Add some lychee meats into jelly cup. 
  10. Store at room temperature and the jelly will settle.
  11. Serve directly from container or serve with evaporated milk.


Apple Crumble Cheesecake with Caramel Sauce 焦糖蘋果酥乳酪蛋糕

Cheesecake and warm Apple Crumble pie are my faviourite desert especially in cold winter time. Fall passed and winter came. Cold breeze outside and strong wind blew. This made me think of having some warm served dessert for my dearest dinner party friends at Ahmami Cafe. Combining Apple crumble and cheesecake is double the delicious. And this can served with ice cream that everyone will love it. Can't wait to try!


Recipe source adapted from Tasty Youtube Channel and The Gold Lining Girl


CARAMEL APPLE CRISP CHEESECAKE

Serves 10-12

INGREDIENTS


Crust

  • 2 cups graham cracker crumbs
  • ⅛ cup brown sugar
  • ⅓ cup butter, melted

Filling
  • 16 ounces cream cheese, softened
  • ¼ cup brown sugar
  • 2 tablespoons cornstarch
  • 1 teaspoon vanilla extract
  • 2 green apples, peeled and thinly sliced
  • ¼ cup white sugar
  • 1 teaspoon cinnamon
Streusel
  • ½ cup old-fashioned oats
  • ¼ cup flour
  • ¼ cup brown sugar
  • ½ tsp. cinnamon
  • ¼ c. cold butter
  • prepared caramel sauce
  • Vanilla ice-cream (Optional)

PREPARATION

Preheat oven to 350°F/180°C.

For oatmeal cookie crust:
  1. In a small bowl, combine all crust ingredients.
  2. Press into the bottom of a greased 8-inch springform pan.
  3. Bake for 5 minutes

For cheesecake:
  1. In a large mixing bowl, beat cream cheese until creamy.
  2. Add brown sugar, vanilla extract and cornstarch, beating until combined.
  3. Pour cheesecake batter over crust.
  4. In a medium bowl, combine apples, cinnamon, and white sugar, tossing to coat.
  5. Carefully layer the apple slices over the cheesecake batter, working from the edges to the center - it will keep the batter from raising higher at the edges. Work from the edges toward the middle.

For streusel:
  1. In a small bowl, combine oats, flour, brown sugar, and cinnamon.
  2. Cut in butter until mixture is crumbly.
  3. Sprinkle it evenly over the apple layer, working from the edges to the center.
  4. Bake at 350 degrees for 30 minutes 
  5. Remove to a wire rack to cool completely.
  6. Serve with ice cream and caramel sauce.

Thursday, 27 October 2016

Apple crumble / crisp chocolate cake cup 烤蘋果酥朱古力蛋糕杯

Apple crisp or apple crumble is a dessert consisting of baked chopped apples, topped with a crisp streusel crust. Ingredients usually include cooked apples, butter, sugar, flour, cinnamon, and often oats and brown sugar, ginger, and/or nutmeg. Wikipedia

Most elementary kids will learn or will make this at school here in Canada. My girls both learned to make this at school in their early elementary school years. I think I only did this once or twice before as my dinner dessert. I always want to make something extraordinary or special kind of desserts for my guests. But I know apple crumble/crisp is still a favourite dessert for some of my friends. They always love to serve it with ice cream. Since I have a chocolate cake in my freezer, I decided to use it together with Apple Crisp and serve it in cups. I placed chocolate cake at bottom of the cup and then scoop the apple crisp (warmed) on top. And of course it is served with ice cream! There is no better way to serve warm apple crisp with ice cream! For chocolate cake recipe, please refer to my Chocolate Cake recipe in my other blog post.


Ingredients
    Topping
  • 1/2 cup all-purpose flour
  • 1/2 cup old fashioned oats
  • 1/2 cup packed light-brown sugar
  • 1/2 tsp baking powder
  • 1/4 tsp ground cinnamon
  • 1/4 tsp salt
  • 1/3 cup unsalted butter, diced into small cubes
  • Apple filling
  • 2 lbs Granny Smith apples (at room temperature), peeled, sliced thin and diced
  • 2 2/3 Tbsp unsalted butter, melted*
  • 2 Tbsp all-purpose flour
  • 3 Tbsp water
  • 1 Tbsp lemon juice
  • 1/2 tsp vanilla bean paste or vanilla extract
  • 1/4 cup light-brown sugar
  • 1/2 tsp ground cinnamon
  • 1/8 tsp ground nutmeg
  • 1 pinch salt
Directions
  • Preheat oven to 375 degrees. In a mixing bowl whisk together 1/2 cup flour, the oats, 1/2 cup brown sugar, the baking powder, 1/4 tsp cinnamon and 1/4 tsp salt for 30 seconds. Add diced butter and using clean fingertips, rub butter into dry mixture until it comes together into small crumbles. Transfer to refrigerator to chill while preparing filling.
  • In a small mixing bowl, whisk together melted butter and flour until well blended, then mix in water, lemon juice and vanilla bean paste. Stir in 1/4 cup brown sugar, 1/2 tsp cinnamon, the nutmeg and pinch of salt. Pour butter mixture over apples and toss to evenly coat, then pour apple mixture into a buttered 8 by 8-inch baking dish and spread into an even layer. Remove topping from refrigerator and sprinkle into crumbles evenly over top of apples. Bake in preheated oven (I baked it in lower half of the oven to ensure the apples cooked through and so the top didn't become too browned) until top is golden brown and apples are tender when pierced with a toothpick, about 35 minutes. Remove from oven and allow to rest 10 minutes before serving (I let mine cool longer than 10 since I was serving in glass cups so they weren't all steamy). Serve warm with vanilla ice cream or sweetened whipped cream.
  • *I know this is a random amount, it's simply the amount that's left after using 1/3 cup butter in the crisp topping - just wanted to use that full stick of butter :).
  • Recipe Source: Cooking Classy
Recipe from: http://www.cookingclassy.com/apple-crisp/


Served with Ice Cream!

Churros with Matcha Chocolate Sauce 西班牙油條配抹茶白朱古力醬

A churro is a fried-dough pastry—predominantly choux—based snack. Churros are popular in Spain, Portugal, France, the Philippines, Ibero-America and the Southwestern United States. In Spain, churros can either be thin or long and thick. (Wiki)

Churro is my favourite snack when we are going to PNE or some theme parks and carnivals. And I always want to do it at home. Unfortunately, I don't like deep frying at all. I personally try to avoid deep frying at home. I don't like the after smell and also it is not a heathy way of cooking. Since we have some leftover deep frying oil from our thanksgiving party, I think it is the right time to try this recipe with around 2 cups of leftover oils. I personally think it is not hard to make compare to cream puffs. And I love the cinnamon sugar that coated on freshly made Churros. I made this for dessert/snack for a dinner gathering at my friend's house. And they were just gone in blink of an eye! 


Churros

Ingredients:

1½ quarts canola oil for frying
1 cup water
4 tablespoons butter
1 cup flour
1 teaspoon vanilla
2 tablespoons brown sugar
¼ teaspoon salt
2 eggs
¼ cup sugar
1 teaspoon cinnamon

Directions:

  1. Mix sugar and cinnamon together in a small bowl. Set aside. 
  2. Heat oil in a medium sauce saucepan until it reaches 370 degrees. 
  3. Meanwhile, combine water, butter, brown sugar and vanilla in saucepan over high heat and bring to a boil. 
  4. Turn heat to low and add flour, stirring with a wooden spoon consistently for about a minute. 
  5. Remove from heat and add eggs one at a time just until combined, not longer. Let the dough rest for about fifteen minutes before spooning into a pastry bag fitted with a large star tip. 
  6. Carefully pipe out 5-inch-long strips directly into hot oil. (I squeeze with one hand and cut the dough off with scissors with the other). 
  7. Fry until golden brown, about 2-3 minutes per side. Remove from hot oil to drain on paper towels. While still warm, toss in cinnamon sugar mixture until coated.

Matcha White Chocolate Sauce

Ingredients:

¼ cup + 3 tablespoons heavy cream
5 ½ ounces white chocolate chips
¼ teaspoon green tea powder

Directions:

  1. Heat cream over stove or in microwave until bubbles start to form around the sides and cream is about to boil.
  2. Add white chocolate chips and green tea powder. Let sit for 2 minutes, then whisk all ingredients until smooth.


Monday, 10 October 2016

Kabocha Mont Blanc Cupcakes 日本南瓜蒙布朗杯子蛋糕

Another dessert beside Gingerbread Pumpkin Trifle and Creme Brulee Cheesecake squares for my Thanksgiving party, I also made this Thanksgiving theme Kabocha Mont Blanc Cupcakes. Kabocha is known as Japanese Pumpkin. It is also kind of winter squash. It is sweet and it is perfect for dessert as well. This is also a make ahead dessert.


Ingredients:

- Kabocha squash 1/8 (about 250g)
- Heavy cream 1/2 package (100ml)
- Sugar 2 1/2 tablespoons
- Cupcakes (store-bought is ok)
- Powdered sugar to taste

Directions:

  1. Bake the cupcakes by referring to my earlier Hello Kitty Cupcakes Recipe. You can also use store-bought cupcakes.
  2. Remove the stringy insides and seeds from the kabocha, cut into large bite-sized pieces, and place into a microwave-safe bowl. Add in 1 tablespoon water, and cover with plastic wrap or a steamer lid.
  3. Microwave at 500W for 5-6 minutes (or steam it for 20 minutes), and heat them until you can stick a toothpick through. Put 2 tablespoons of sugar and 50ml of heavy cream into a food processor along with the kabocha, and blend until smooth.
  4. Add 1/2 tablespoon sugar to the remaining heavy cream, and whip.
  5. Cut the top of Cupcakes to make it flattened. Squeeze the cream on top of the cupcakes, and squeeze out the kabocha paste using a Mont Blanc pastry bag. After squeezing a large swirl on top, squeeze it across and vertically.
  6. Sprinkle with powdered sugar, and it is done! Chill in the fridge, and enjoy!

Recipe adapted from: Washoku Guide Website

Gingerbread Pumpkin Trifle 南瓜薑餅Trifle

This is the main dessert that I will serve for my Thanksgiving party this year. I doubled the receipt to make 2 trifle bowls for 50 servings. It is easy to make and can also make ahead of time. This can be a substituted of traditional pumpkin pie for Thanksgiving party dessert.


Gingerbread Pumpkin Trifle (Served 12)

Gingerbread Cake (Or just use 1 box of gingerbread cake mix and baked according to directions on the box)

Ingredients:
All Purpose Flour 1 1/4 cup / 150 grams
Baking Powder - 1.5 tsp
Baking Soda- 1/2 tsp
Cinnamon Powder - 3/4 tsp
Ginger Powder - 1/2 tsp
Ground Cloves - a pinch
Salt - 1/4 tsp
Honey - 1/2 cup / 120 ml
Oil - 1/2 cup / 120 ml
Eggs - 1 large
Water - 3/4 cup / 180 ml
  • Brown Sugar - 1/2 cup / 100 grams packed

Directions

  • Preheat oven to 160 degree C (325 F). Line a 20 cm square baking pan with parchment paper and grease it well with oil. Set aside.

  • In a sauce pan, take 1/2 cup of water and bring it to a boil. Take it off the heat and add in honey and mix well. Now add in baking soda and mix well. Now add in 1/4 cup of water and mix well. Set aside so it gets cold.
  • Now In another bowl, add flour, baking powder, salt, cinnamon, cloves, ginger and mix well. Set aside.
  • In another bowl, take oil, jaggery or brown sugar and mix well. Add in egg and whisk well.
  • Now add in half of the flour mix in and fold gently. Now add in all the honey mix and mix well.Add in the remaining flour and mix well.
  • The batter will be very runny. Pour this batter in the cake pan and bake this for 40 to 45 mins till a tooth pick inserted comes out clean.
  • Now remove it from oven and cool it down completely.

                      Pumpkin layer:

                      Ingredients:

                      1 (15 oz) can pumpkin puree (not pumpkin pie filling)
                      1 (14 oz) can sweetened condensed milk
                      1 (5.1 oz) package instant butterscotch pudding mix
                      1/4 cup milk
                      1 teaspoon pumpkin pie spice
                      1 teaspoon cinnamon
                      3 tablespoons brown sugar
                      3/4 of a (10 oz) bag of ginger snap cookies or about 25 ‐30 cookies

                      Whipping cream layer:
                      1 (12 oz) container frozen whipped topping, thawed or homemade whipped cream

                      Directions:

                      Pumpkin Layers:

                      In a medium sized mixing bowl, combine the pumpkin, sweetened condensed milk, butterscotch pudding mix, the milk, the spices and the brown sugar and whisk until mixture is smooth and thickens. (About 1‐ 2 minutes) Set mixture aside.

                      Trifle Assembling:


                      1. Cut the gingerbread into 2‐3 inch squares. Layer your trifle bowl or large clear glass bowl with half of the gingerbread.
                      2. Then crumble 5‐6 cookies over the gingerbread layer. Layer in about 1/2 of the whipped topping, then layer in half of
                      3. the pumpkin topping. Repeat again with the gingerbread layer, a few crumbled cookies, the whipped topping and then
                      4. ending with the pumpkin layer on top and a few crumbled cookies.
                      5. If you like you can save a little extra whipped topping to decorate the top of the trifle and use some whole cookies to
                      6. go around the top outside rim of the bowl.
                      7. Cover with plastic wrap and refrigerate for at least and hour or two before serving.
                      8. You can substitute store bought pound cake for the gingerbread to save time. The flavor is different but still very
                      9. yummy.
                      10. Trifle can be made a day ahead of time and kept covered in the refrigerator.
                      11. Leftovers can also be covered and refrigerated for 2‐3 days.

                      One Bite Crème Brûlée Cheesecake Squares 一口焦糖芝士蛋糕

                      This year Thanksgiving, I am only responsible for preparing desserts. We had 3 other beautiful lady chefs to help out for all Appetizers and main dishes. Therefore, I can focus on making desserts that serve 50 guests. Beside Thanksgiving theme desserts: Gingerbread Pumpkin Trifle and Kabocha (Japanese pumpkin / winter squash) Mont Blanc Cupcakes, I also made this Crème Brûlée Cheesecake Square. This can easily make ahead and I only need to sprinkle sugar and torch it right before serving. Easy to make and it is so Yummy! One of my guest volunteer to torch it for me! 


                      One Bite Crème Brûlée Cheesecake Square

                      Ingredients (Make around 25-30 one bite size squares)

                      For the crust:

                      1 1/4 cups finely crushed graham cracker crumbs (from 9 sheets)
                      2 Tbsp granulated sugar
                      6 Tbsp butter, melted (preferably salted)

                      For the fillings:

                      3/4 cup granulated sugar
                      1 1/2 Tbsp all-purpose flour
                      2 (8 oz) pkgs cream cheese, softened
                      3 large eggs
                      3 Tbsp heavy cream
                      3 Tbsp sour cream
                      1 tsp vanilla extract
                      6 Tbsp granulated sugar

                      Directions

                      For the crust:

                      Preheat oven to 350 degrees. Generously butter an 8 by 8-inch baking dish. In a mixing bowl,
                      whisk together graham cracker crumbs and sugar. Pour in butter and use a fork to mix until
                      evenly moistened. Press mixture into an even layer in prepared baking dish and bake in
                      preheated oven for 10 minutes. Remove from oven and allow to cool while preparing filling.
                      Reduce oven temperature to 325 degrees.

                      For the filling:


                      • In a mixing bowl, whisk together 3/4 cup granulated sugar with the flour. 
                      • Add cream cheese to mixing bowl and using an electric hand mixer set on low speed, blend together cream cheese and granulated sugar mixture just until smooth, about 1 minute. 
                      • Add in eggs one at a time and mix just until combined after each addition. 
                      • Add heavy cream, sour cream and vanilla and blend just until combined. 
                      • Tap bowl forcefully against countertop about 30 times to release air bubbles. Butter the side of the baking dish and pour filling over crust. 
                      • Set the 8 by 8-inch baking dish into a 13 by 9-inch baking dish (a roasting pan would be fine too) and pour about 3 cups of hot water into the 13 by 9-inch baking dish (or enough water to make the water level reach halfway up the sides of the 8 by 8-inch dish. You are only pouring the water into the pan without the cheesecake in it, simply to create a water bath which will help the cheesecake cook more evenly and reduce the possibility of cracking). 
                      • Bake in preheated oven until cheesecake is fairly jiggly, about 42 - 45 minutes, then turn oven off and allow cheesecake to rest in warm oven with door closed about 10 minutes longer or until center only slightly jiggles.
                      • Remove from oven and allow to cool on a wire rack at room temperature 1 hour, then cover and chill 4 hours.

                      For the topping:


                      • Cut bars into squares. 
                      • Sprinkle each square with an even layer of sugar and melt sugar with a culinary torch (it will melt into beads then bubble, then caramelize and turn to a smooth surface). 
                      • Allow topping to cool then pipe or spoon a small dollop of whipped cream over top (optional).


                      Recipe Sources: Cooking Classy (Creme Brulee Cheesecake Bars) 

                      Wednesday, 21 September 2016

                      Black Sesame Tofu Cheesecake 黑芝麻豆腐芝士蛋糕

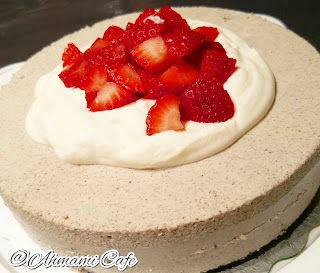
                      Two weeks later, I will need to teach a group of senior to make Tofu cheesecake. Therefore, I will need to dig up my Tofu recipe again and to practice a little. I use my old Tofu cheesecake recipe and modify it a little to become Black Sesame Tofu Cheesecake. It is still very simple to make and I am sure I can teach my senior friends to make this in a half an hour class time.  


                      材料: (6吋蛋糕份量)

                      餅底材料: 消化餅 105g (~8塊)、溶化牛油 45g
                      做法:
                      • 消化餅弄碎,加入溶化牛油拌勻,放入6吋餅盆內壓實,放入雪櫃待用 。 (Pic 1)


                      豆腐芝士餡料 :忌廉芝士 100 g,  淡忌廉 140 g, 嫩豆腐180 g, 糖 70 g, 魚膠粉7 g +室溫水21g,  黑芝麻粉 5 TBSP

                      做法:

                      1. 魚膠粉加室溫水拌勻後坐於熱水中煮至溶化待用


                      2. 豆腐花用篩隔去水份備用

                      3. 忌廉芝士加糖打至滑身

                      4. 把豆腐花加入芝士糊中, 再打至滑身, 加入黑芝麻粉拌勻 (Pic 2 & 3)

                      5. 把已溶魚膠粉水加入豆腐芝士糊中拌勻 (Pic 4)


                      6. 打起淡忌廉(約7-8成) (Pic 5)

                      7. 再加入已打起淡忌廉 (Pic 6) , 

                      8. 以手動打蛋機器拌勻 (Pic 7)

                      9. 從雪櫃中取出已加餅底之餅模,將混合物倒入模中 (Pic 8) ,用錫紙封口並放入雪櫃雪 4 小時

                      Saturday, 10 September 2016

                      Matcha Zenzai


                      Matcha+Red Bean+Mochi = Perfect Match

                      Summer is over and now we all back to routine to those with Kids at school age. Last blog that I wrote is already few months ago. Over the summer, we went clam digging and we moved our party outdoor. We had great fun and great fellowship at Birch Bay! And of course great harvest of Horse Clams and other clams. For this year end of summer party dinner, I made a few desserts. This Matcha Zenzai was one of them. It is not an expensive dessert at all. But I recommended you will make your red bean paste. It tastes lots better than the store bought (Too Sweet). The sweetness can be adjusted accordingly. 

                      For original recipe, please refer to Just One Cookbook Matcha Zenzai website

                      Anko (red bean paste) - make ahead

                      Ingredients:

                      Anko (Red Bean Paste) - make ahead
                      Ingredients:
                      200g Azuki Beans 
                      Water 
                      200g white sugar 
                      Pinch of salt

                      Directions:

                      Stove top: Please refer to Just One Cookbook "How to make Anko" recipe
                      Pressure Cooker: Please refer to Just One Cookbook "Pressure Cooker Anko" recipe

                      Mochi (Shiratama Dango) - 6 pcs

                      Ingredients:

                      • ¼ cup Shiratamako (Glutinous rice flour)
                      • ¼ tsp Sugar
                      • 2 Tbsp warm water


                      Directions:

                      1. Put 1/4 cup shiratamako and 1/4 tsp sugar in a bowl and stir in 2 Tbsp warm water a little bit at a time until dough is combined and smooth. Roll the dough in long tube shape. Cut and divide into equal pieces. Then roll the piece into a ball then use your thumb to press the center to flatten.

                               2. Cook the shiratama dango in boiling water. About 1-2 minutes, they will start to float when                  shiratama dango is cooked through. Pick them up and soak in ice water to cool.

                      note: If it is not serve right away, you can keep this in fridge and soaking them in cold water in tight container. Bring it out and reheat it in boiling water or place them in bowl cover with hot water and place in microwave to reheat it.


                      For Matcha Zenzai

                      Ingredients:

                      • 1 Tbsp Match (green tea powder)
                      • 1-1½ Tbsp Sugar (adjust according to your taste)
                      • 1 Cup hot water
                      • 120g Anko (Red bean paste - Please refer to recipe above for homemade version)
                      • Kinako (Soy Bean Flour) for garnish - optional

                      Directions:

                      1. Put 1-1½ Tbsp Sugar in bowl and sift 1 Tbsp matcha powder in fine sieve.
                      2. Add a bit of hot water and mix with a whisk. Then add remaining hot water and mix well

                      To Assemble:

                      1. Place Anko and Shiratama Dango in serving bowls
                      2. Pour green tea and garnish with a little bit of Anko and Kinako (Soy Bean Flour)

                      Monday, 30 May 2016

                      10" 2-layers Sashimi Sushi Cake

                      Made this for my husband's birthday party! This 2 layers sushi cake was made out with 5 cups of rice ~ 10 bowls of cooked rice. The ingredients for this sashimi cake included: Ahi Tuna, Sockeye Salmon, Hotate, Masago, Amaebi, Egg, Avocado, Seaweed and Sesame


                      On the bottom of pan, I placed a layer of Sockeye Salmon and Ahi Tuna slices. 
                      2nd layer (Rice)
                      3rd layer (Avocado, sesame, seaweed, ahi tuna and salmon slices)
                      4th layer (Rice)

                      Then flip pan over with a big plate. Unmold.

                      Decorated with avocado, Radish sprout, Hotate, masago, Amaebi,and Egg.

                      Sunday, 29 May 2016

                      Raindrop Cake (Mizu Shingen Mochi 水信玄餅)

                      One night a few months ago, my husband showed me a video of this fun little dessert. I watched the video and I found it is an easy dessert that I can make any time. Yesterday was my husband's birthday celebration party. I made him a Sashimi sushi cake as birthday cake. And I made Oreo Earl Grey ice cream sandwich and Iron Buddha Panna Cotta as dessert. Since it is a Bbq party, I don't have to cook anything. Sushi cake was made in early afternoon and the other two desserts were prepared a head of time. And it is still a few hours before the party starts, I decided to make this little fun dessert.


                      Recipe:
                      Ingredient:
                      1g (1/2 tsp) Agar Powder
                      1g (1/2 tsp) sugar
                      450ml water

                      Direction:
                      1. Mix everything together in a saucepan and bring it to a boil.
                      2. Pour dissolved agar powder water to dome mold. It can make 6 domes.
                      3. Refrigerate until it settled.
                      4. Served with brown sugar syrup (I substitute it with Maple syrup because I don't have brown syrup at that moment) and Soy bean flour.


                      Thursday, 19 May 2016

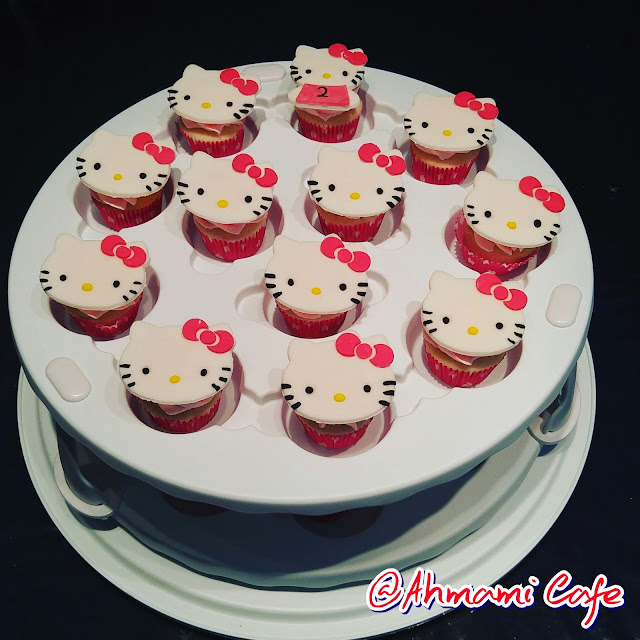
                      Hello Kitty fondant topper cupcakes (Hello Kitty 小蛋糕)

                      I can't remember how long I did not receive cupcake or cake order since I go back to work part time for over a year and a half now. I don't have time for making details fondant cake or fondant toppers like before, and I told my friend that I "retired" and will not take any cake orders now (I was asked a few times over the last year). I am so glad that my friend came back to me to re-order the cakes or cupcakes over the last year. 

                      This cupcake order is an exceptional case. This friend of mine is very desperate in finding a good bakery in Richmond. And seems like she cannot find any and the big day is approaching. She PM me and asked if I still take cupcake order. At the very beginning I turned down her request. But after knowing a bit more of what she needs, she only needs 20 mini vanilla cupcakes with 12 Hello Kitty toppers for her daughter's daycare birthday celebration. Since I got this Hello Kitty cutter at home, (it looks like I can handle it with my current schedule) and it is not a really time consuming and it is not a big project like before. At last, I am so excited that I offer help to make cupcakes for her. 

                      When I sit at the table and start working on the toppers, I feel so excited that I can tell I am really enjoy doing all these fondant art. 

                      Happy 2nd Birthday Charis!


                      Fondant Recipe:

                      For Fondant Recipe, please refer to my earlier Marshmallow Fondant (MMF) Recipe  post

                      Basic Vanilla Recipe: 

                      Ingredients

                      Cupcakes: (36 mini size or 24 original size cupcakes)
                      150g butter, softened
                      1 1/2 cups Caster Sugar (Adjust to your taste)
                      2 eggs
                      2 tsp vanilla essence
                      2 1/2 cups self-raising four
                      1 1/4 cups milk

                      Buttercream Icing:
                      100g butter, softened
                      1 1/2 cups Icing Sugar
                      2-3 drops vanilla essence
                      1-2 Tbsp milk

                      Method

                      Cupcakes: 
                      Preheat oven to 350°F or 170°C. 
                      Beat butter with an electric mixer until smooth, add Caster Sugar and beat until light and fluffy. 
                      Add eggs and mix well. Add the sifted flour, milk and vanilla, beat until smooth. 
                      Place paper baking cases in a cupcake tin, spoon in mixture until they are about 2/3 full (don't overfill or they will form peaks). This recipe makes 24 cupcakes or 36 mini size cupcakes so you
                      might need to do this in two batches. 
                      Bake for 15-20 minutes until golden or until they spring back when lightly pressed. Turn out onto a wire rack to cool while you prepare the icing.

                      Buttercream Icing
                      Beat the butter until it is pale and fluffy. Sift in the Icing Sugar, add the vanilla essence and milk until you have a light, fluffy mixture. Add extra milk if you need a softer consistency. Spread or pipe icing over cupcakes and top with decorations as desired.

                      Recipe from: Chelsea Sugar Website

                      Sunday, 1 May 2016

                      Jelly inside jelly (Coconut and mango) 芒果椰子啫喱

                      Tonight's dinner party, we have 10 adults and 11 kids. Beside making Iron Buddha Tea Panna Cotta dessert and Honey Lavender Ice cream, I am looking for something more kids friendly dessert. What I come to mind is Jelly, I guess jelly is all time favourite for both adults and kids. I originally thinking of making Milk Tea with coffee jelly cube. But my other panna cotta dessert already used tea (caffeine) ingredient, I better think of some ingredients that is not caffeine related. I searched over my kitchen and trying to find any ingredients for jelly recipe. I found a box of Mango Jello powder. Coconut and mango came in my mind and I found a can of coconut milk too. White and orange bring good colour contrast and taste are also good match.  I can save a trip to grocery store and I can made an extra dessert.


                      Ingredients:

                      (Mango Jelly)
                      1 packaged of Mango Jello
                      225ml hot water + 225ml cold water
                      1/2 tbsp Gelatin (1/2 envelop of gelatin)

                      (Coconut milk jelly)
                      300ml Coconut Milk
                      100ml Condensed Milk + 100ml Boiling water
                      1 tbsp Gelatin (1 envelop of Gelatin)

                      Directions:

                      (Mango Jelly)
                      1. Dissolved Mango jello powder and 1/2 tbsp Gelatin in 225ml boiling water.
                      2. Add 225ml of cold water. Mix well.
                      3. Coat container with oil and pour jelly mixture into container.
                      4. Put in refrigerator for 3 hours or until set.

                      (Coconut Jelly)
                      1. When Mango Jelly is set. Boil 100ml water in saucepan. Add 100ml condensed milk and stir until dissolved. Turn off heat
                      2. Sprinkle Gelatin in condensed milk and stir until all gelatin dissolved. 
                      3. Add 300 ml coconut milk. Mix well. Set aside until cool a bit.

                      Assemble:
                      1. Unmold Mango Jelly, and cut into cubic shape. Scattered into other greased Jelly pan.
                      2. Pour coconut jelly mixture to jelly pan with mango jelly cubes. 
                      3. Put in refrigerator for 3 hours or until set.
                      4. Unmold Jelly and cut into cubic shape. Serve Cold.

                      (Tieguanyin) Iron Buddha Tea Panna Cotta 鐵觀音奶凍

                      Last week I had dinner at Zakkushi and tried their roasted tea pudding. It was so good and I remembered I had Iron Buddha (Tieguanyin) soft ice cream when I was in Hong Kong. These two pudding are using Chinese/Japanese tea leaves as ingredients. I did Chai, Thai tea and Earl grey panna cotta before. Why not using some Chinese tea to make panna cotta this time? It should taste good.


                      Ingredient: Served ~30 x 2 oz cup

                      1/4 cup of (Tieguanyin) Iron Buddha Tea leaves (or 5 tea bags)

                      800ml whipping cream
                      200ml whole milk
                      1 1/2 Tbsp Gelatin (or 1 1/2 envelops of gelatine) with 4 1/2 tbsp water
                      1/3 cup sugar (Adjust accordingly to taste)


                      Directions:


                      1. Heat 400ml heavy cream and 200ml milk in a saucepan until simmering hot. Then add the tea bags. Turn off heat and soak tea bags. Cover the pot and let soak for 20 minutes.
                      2. Squeeze tea bags and take out tea bag from saucepan. Add remaining 400 whipping cream. Heat the Panna Cotta up a few minutes to warm it back up. Meanwhile, sprinkle the gelatin over the cold water in a medium-sized bowl and let stand 5-10 minutes. Microwave gelatin for 30 seconds or until all gelatin dissolved in water.
                      3. Place a sieve over the bowl of gelatin and strain the Panna Cotta mixture into it, stirring until the gelatin is completely mixed.
                      4. Divide the Panna Cotta mixture into the cups and chill them until firm, about 2-4 hours.