Showing posts with label Chinese dessert. Show all posts

Tuesday, 26 May 2020

楊枝甘露杯子 Mango Pomelo Sago Pudding Cup


4人份 serve 4
芒果 4pcs mango
西米 80g sago
椰漿 160ml coconut milk
淡奶 160 ml evaporated milk
水 160ml water
糖 45g sugar
柚 4pcs pomelo

1.西米加水蓋過浸10分鐘 (Soak Sago in water for 10 mins)

2.再用大火煮5分鐘(水要多一點才不會痴底) (Boil in boiling water for 5 mins)

3.關火後加蓋焗約十分鐘 直至中心都變為透明 (Turn off heat and let it covered and continue to cook for 10 mins until it became transparent)

4.放入冰水過冷河(會更爽口) 雪凍備用 (Pour cooked Sago to ice water bath and store in fridge)

5.水加入糖及椰漿煮滾 再加入淡奶 雪凍備用 (Heat coconut milk and sugar into boiling water, add evaporate milk until sugar dissolved). Store in fridge.

6.柚子四片起伕後挪成粒粒(用咩柚都可以 只是味道有點不同 這種帶少少酸味) (Cut pomelo and take out the pomelo meat)

7.芒果起肉切粒 分成兩分 (Cut Mango into cubes and divided intro 2 portions)

8.將一份芒果粒用攪拌機打成芒果汁 (Puree one portion of Mango cubes in blender)

9.芒果汁加入先前的椰奶,西米混合 (Add Mango puree to Step (5) coconut milk mixture)

10.雪凍後加入芒果粒及柚子肉 (Add pomelo and Mango before serving)

11.完成 (ready to serve)


Sugar Egg Puffs 沙翁 (蛋球)

Sugar Egg Puff is my childhood all time favorite dessert when having dim sum with family in Hong Kong. After I moved to Vancouver, I can still find some restaurants making Sugar Egg Puff during dim sum serving in early 90's or 2010's. Nowadays, I don't think restaurants offer this in their menu anymore. If they do, it doesn't taste authentic as those I had in my childhood. I decided to make it myself. I used Air Fry in my first attempt but the texture is not the same as what I am looking for. So I use my Optimum Points to redeem a mini deep fryer machine to deep fried my puffs. It is a total success!!! 


六個份量 (6 people's serving) ~20 pieces

Ingredients:
蛋 3psc egg
高筋麵粉 100g bread flour
水 150ml water
無鹽牛油 70g unsalted butter
糖 -60g sugar

Directions:
1. 水加入無鹽牛油煮滾 (In saucepan, add butter to water, then bring them to boil)
2. 再加入高筋麵粉 用慢火煮成糰 (Turn down the heat to low and add bread flour, keep stirring until it becomes a dough)
3 直到個底有一層薄薄的麵糰咁就可以以慢慢加蛋 (Add one egg at a time to the dough and mix well)
落完一隻混合好再加第二隻,一次話落晒會好難混合
4 準備定一鑊油 Preheat the oil (I use 350F in my deep fryer or low heat for tradition deep frying using saucepan)
用最少火力加熱
5 落一大湯匙咁左右的麵糰 落到去只有少少氣泡即是油溫ok,太熱燶晒會炸唔起, 炸到金黃色漲大幾倍之後就ok啦 (Scoop out ~1 Tbsp of batter and deep fried until it doubled or tripled the original size)
6. 再係表面粘上一層砂糖就食得(Pour sugar in ziplock bag, add the Puff into the bag and shake it until it is coated with sugar)
7. Stored it in dry place, do not cover it. Better to serve on the same day.


Recipe source: http://dimcookguide.com/sata-andagi/

Thursday, 1 November 2018

奶皇西米糕 (Recipe in Chinese) Tapioca Custard Cyrstal Cake


奶皇西米糕


16x
材料
西米100g , 鮮奶1支 , 馬蹄粉70g , 淡奶50ml , 吉士粉2湯匙 , 油 , 雞蛋1隻 , 牛油 , 糖45g+30g , 麵粉2湯匙 , 蛋撻模 , 水70ml , 掃

做法
1. 雞蛋打入大碗內 , 加入吉士粉 , 麵粉 , 100ml鮮奶拌勻至冇粉粒
2. 煲內放入45g砂糖 , 牛油 , 花奶及餘下的150ml鮮奶拌勻
3. 用中火煮至牛油溶化 , 加入之前的雞蛋吉士糊 , 用慢火一路拌勻一路慢慢煮至杰身
4. 盛起待涼20分鐘再放入冰箱冷藏1小時
5. 西米放入煲內 , 加水蓋過面拌一拌勻
6. 用中火煮滾後再拌一拌勻西米以免黏底 , 熄火蓋上蓋焗20分鐘
7. 將西米隔水倒在隔篩內 , 用水沖洗雜質 , 瀝乾水份加冰水浸過面靜待10分鐘
8. 馬蹄粉 , 30g砂糖 , 水及少許油拌勻至冇粉粒
9. 浸10分鐘的西米瀝乾水份放入大碗內 , 加入馬蹄水拌勻
10. 奶皇餡1小時後從冰箱取出拌一拌勻
11. 蛋撻模掃上油 , 先放西米糊至一半滿 , 放入奶皇餡 , 再放入西米糊至全滿
12. 放入電蒸鍋內蓋上蓋蒸10分鐘
13. 蒸好待20分鐘至涼
14. 待涼期間繼續將西米糕放入電蒸鍋蓋上蓋蒸10分鐘
15. 將待涼的西米糕用竹簽起出
16. 逐一將其餘的西米糊放入蛋撐模至一半滿 , 放入奶皇餡 , 再放入西米糊至全滿
17. 放入電蒸鍋內蓋上蓋蒸10分鐘 , 再待涼起出直至西米糊用完即可

Recipe from: http://elanie-kitchen.blogspot.com/2018/05/blog-post_7.html?m=1

Wednesday, 25 November 2015

Ube (Purple Yam) Coconut Pudding 紫薯椰子布丁


INGREDIENTS (makes 20 x 2oz cup)

·               1 (16 oz) package frozen grated purple yam (Ube) (Pic 1), thawed 
·               2 cups coconut milk
·               1 can of condensed milk
·               1 cup whipped cream
·               1 tbsp gelatin plus 3 tbsp water
·               1 tsp vanilla extract (optional)
·               For Garnish: 1/2 cup of whipped cream plus some toasted grated coconut

INSTRUCTIONS

1.    In a pot, combine coconut milk, condensed milk, grated purple yam and vanilla, if using.(pic 2)
2.    Stirring constantly for 30 minutes or until mixture is thick and sticky. (Pic 3)
3.    Sprinkle gelatin to water. Microwave in half power for 30 seconds, repeat until all gelatin dissolved in water. Add it to the purple yam batter. Mix well. 
4.    Coola and set aside mixture. Whip whipping cream until soft peak. Add whipped cream to mixture and mix well (Pic 4).Then transfer mixture to serving cup and refrigerate until all set.
5.    Add whipped cream and sprinkle some toasted grated coconut for garnishing.


Recipe adapted from : http://salu-salo.com/filipino-purple-yam-dessert-halayang-ube/

Saturday, 26 September 2015

Baked Tart Crust Custard Moon Cake (曲奇皮)奶皇月餅

This is a very yummy moon cake and it is different from the traditional moon cake. The filling is not Lotus fillings, it is custard fillings. And it is covered by crispy Tart Crust.


Recipe (Makes 8 x 50g )

奶皇餡 Custard Fillings: 

Ingredients: (8 x 50g Mini Mooncake) Pic 1

吉士粉 Custard Powder                               30g
奶粉Milk Powder                                         13g
全蛋Egg                                                       25g (about 1/2 large egg - save the remaining for later use)
蛋黃 Egg Yolk                                             15g (one egg's egg yolk)
砂糖 Sugar                                                   46g
淡忌廉 Whipping Cream/Evaporate milk   38ml
椰奶(漿) Coconut Milk                                74ml
無鹽牛油(切粒) Unsalted Butter (Diced)    23g
鹹蛋黃(蒸熟) Salted Egg Yolk (Steamed)     4個(每個分成4份) (Divided into 4 pieces each)

做法 Directions:

1.     將吉士粉及奶粉混合,加入一半椰奶,拌勻 (Pic 2)
2.     將全蛋及蛋黃打散,加入一半砂糖,拌勻後倒入步驟(1)內,拌勻
3.     將剩餘的椰奶及砂糖、淡忌廉、無鹽牛油放入鍋內,用細火煮滾,邊煮邊攪拌 (Pic 3)
4.     煮滾後倒入步驟(1)內,拌勻,倒回入鍋內,以中火煮至杰身成糰狀 (Pic 4)
5.     倒入大碗內,用保鮮紙緊貼奶皇表面,待冷卻後放入雪櫃冷藏一晚
6.     取出後,平均分割出每粒自己所需重量,包入1/4個鹹蛋黃


月餅皮 (Tart Crust)

Ingredients: Pic 5

砂糖 Sugar                            35g
有鹽牛油  Salted Butter       65g
全蛋 Egg                               10g
花奶  Evaporated Milk         15g
低筋粉Cake Flour              125g
吉士粉Custard Powder          8g

做法 Directions:

1.     將砂糖及有鹽牛油用電動打蛋器打發變白 (Pic 6)
2.     加入全蛋及花奶,打至完全混合 (Pic 7)


3.     加入低筋粉及吉士粉 (Pic 8 &9),用膠刮用切割方法及按壓法 (Pic 10),攪拌成糰 (Pic 11),用保鮮紙包裹(Pic 12),放入雪櫃冷藏半小時備用


4.     取出後,平均分割出每粒自己所需重量


掃面及手粉材料 (Egg wash / flour coat for mould):

高筋粉適量 (Regular Flour for coating the mold)
全蛋1隻加蛋黃1隻 (Egg wash - Egg+Yolk)
糖水(砂糖:水 1:1) 適量 (Sugar water for glazing Water:Sugar 1:1) Optional


Assembling:
組合:
1.    將一塊餅皮擀平成圓形 (Pic 17),包入一粒奶皇餡 (Pic 18)
2.    月餅模內沾上高筋粉,多餘的倒出 (Pic 19) 放入月餅模內 (Pic 20),推壓出造型月餅 (Pic 21)


3.     將做好的月餅放入雪櫃冷藏半小時,使餅皮硬身一點,以免焗時瀉身 (Pic 22)
4.     預熱焗爐250°C
5.     先焗5分鐘,取出,掃上薄薄2層蛋液,吹乾約10分鐘 (Pic 23)
6.     再次放入焗爐,焗約8-10分鐘至金黃色
7.     出爐後掃上糖水,放上涼架,完全涼透才可入盒


Thursday, 26 March 2015

Chocolate Egg Bubble Waffle◆朱古力雞蛋仔◆ (with video)

Chocolate Egg Bubble Waffle◆朱古力雞蛋仔◆

Served with Ice cream, chocolate syrup and icing sugar.

I haven't make this bubble waffle for a long time. It is not hard to make and it doesn't need lots of preparation time. The only two things that make me hesitate to do it again are the waffle pan is heavy, and the second is the cleaning is a bit hard. I would suggest any ladies who want to make this at home. Try to ask your husband or your son to help you on flipping the waffle pan and to do the cleanup. Last time I made this was 3 years ago. I made regular and green tea flavour egg bubble waffle. I add one tablespoon of cocoa powder to the original flavour batter. And that makes chocolate egg bubble waffle.


Wednesday, 22 January 2014

Black Sesame roll 黑芝麻卷 (菲林)


Ingredients: 24pcs(17.5cmx8cm pan)
Ground black sesame powder 100g
sugar 100g
rice flour 100g
water chestnut flour 30g
water 500ml

Directions;
  1. Bake black sesame powder at preheated oven at 180C  or fry it using a pan until you smell the  aroma of black sesame. Set it aside and cool down.
  2.  Mix everything with 500ml water. Use a whisk or blend them well in a blender. (Pic 1-3)
  3. Use square or rectangular pan. Oil the bottom of the pan.
  4. Pour black sesame mixture to pan in thin layer (0.5cm). Steam 2-3 minutes until firm. (Pic 4)
  5. Take it out and cool down for 3-5 minutes, roll it and then trim both end.(Pic 5)
Tips:
  1. Make sure you stir the mixture before pouring into pan
  2. Apply some oil into paper towel, then use oiled paper towel to apply oil to pan before steaming.
  3. Use a toothpick to check if the sesame mixture is cooked or not. If it came out clean, then it is cooked.

材料Ingredients: 24 pcs(17.5cmx 8cm pan)
黑芝麻粉100克
砂糖100克
粘米粉100克
馬碲粉30克
清水500ml

步驟Directions:
(1)    黑芝麻粉放入已預熱180度焗爐內焗至香味散出,沒有焗爐可以白鑊中小火炒香, 炒香後放涼備用,
(2)    將所有材料拌勻至完合溶解 (最好有攪拌機打3-5分鐘) (Pic 1-3)
(3)    糕盆塗油: **方形的容器最佳,因為可以捲起時厚薄一致。
(4)    倒約半杯芝麻漿 (0.5cm 厚), 大火蒸2-3分鐘至凝固 (Pic 4)
(5)    取出攤凍約3-5分鐘, 捲好後可將兩端切齊, 切件即可食用 (Pic 5)


小貼士:
(1)    每次傾入芝麻漿前必須將之調勻, 才倒進糕盤內
(2)    糕盆塗油的方法, 只須用廚房紙將油抹勻糕盆便可, 省時方便, 又可減少油份
(3)    蒸糕時要知道是否熟透, 可用牙籤插入糕中間, 若不沾着糕便已熟

Monday, 20 January 2014

Thai Mango Coconut Sticky Rice Dessert 泰式芒果黑白糯米飯


芒果椰汁糯米飯
( 4 人份 ) Serves 4
材料Ingredients:
  • 白糯米 Glutinous rice 1 (杯)cup ( 用 250 ml 容量的量杯為準 )
  • 黑糯米 Black glutinous rice 1(杯)cup
  • 熟透的芒果 Ripe mango 2 (個)
      拌飯椰汁 (Coconut milk for cooking rice)
  • 椰奶(Coconut Milk) 1 1/2 (杯) cup
  • 糖 sugar1 (杯) cup
  • 鹽 salt 半茶匙 1/2tsp
      椰奶漿 (Coconut cream sauce)
  • 椰奶(Coconut Cream) 1 1/2 (杯) Cup
  • 糖 sugar 2 (湯匙) Tbsp
  • 鹽 salt 1/4 (茶匙) Tsp

做法 :
  1.  黑白糯米洗淨後用清水浸泡 4 小時 (pic 1),瀝乾。黑糯米放入電飯煲煮。(Pic 2) 白糯米放在玻璃或不黏底的盤碟內,隔水蒸 35 - 45 分鐘 (Pic 3-4)。
  2. 蒸飯期間,切芒果 (Pic 5)。把拌飯椰汁在小煲內煮溶備用。
  3. 飯好後挑鬆,趁熱倒入一半拌飯椰汁(Pic 7),與飯撈勻 (Pic 8),隔水蒸15分鐘。另一半拌飯椰汁放在黑糯米電飯煲內再次煮。
  4. 再用小煲把做椰奶漿的椰奶 (Coconut Cream)、糖和鹽煮溶
  5. 用小碗盛飯,不要壓太實,好讓稍後淋上的椰漿能滲透入飯去;反扣在碟上,伴芒果上桌。
 Directions
  1.  Wash black and white glutinous rice, then soak into water for at least four hours (Figure 1). Drained glutinous rice. Cook black  with rice cooker using normal cooking rice function (Picture 2). Place white glutinous rice (thin layer) onto cheesecloth and steam for 35 - 45 minutes (picture 3-4).
  2. While cooking the rice, prepare Mango by cutting into chunks or cutting into thin slices and create a rose like mine (Pic 5). Boil coconut milk with sugar and salt with a small pot. Then set aside.
  3.  After the rice is done, mix rice with 1/2 of the coconut milk mixture. Mix well and steam for another 15 minutes. Mix black glutinous rice with remaining 1/2 coconut milk and press the rice cooker and cook again.
  4. While waiting for recooking the rice with coconut milk, let's prepare coconut cream sauce. Boil coconut cream with sugar and salt. Set aside.
  5. After the rice is done, serve it with mango. Pour coconut cream sauce over the rice and mango. Served.

 
I place a cheesecloth onto the electric steamer. Place sticky rice in thin layer and then steam.

My friend gave me a very big mango. I cut into thin slices and make it as rose petals.
I bought coconut cream as coconut sauce because the texture is thicker. If you cannot find it, you can still use coconut milk. You might need to thicken it by adding corn starch when cooking it with sugar and salt.

Monday, 14 October 2013

Herbal Jelly with Lychee and Dragon Fruit Dessert 荔枝火龍果涼粉


This is a dessert similar to the one I made in Hong Kong. Just play around with different ingredients and make it a new kind of dessert. It is also using herbal jelly as base, then add fruits to it. This time I use canned lychee and fresh dragon fruit. 

How to do:
 Cut canned herbal jelly into cubes.
Open canned lychee,  pour lychee syrup from can to herbal jelly and let the jelly soak in syrup for a while. 
Cut lychee into small pieces. 
Cut dragon fruit into pieces as well.
Place them separately in container. Put in refrigerator until use. 
Add 3-4 tbsp of coconut cream to decorate ( add according to taste)
→Serve with shaved ice or vanilla ice-cream←

Sunday, 18 August 2013

芒果奶昔蛋白燉奶 Mango milkshake with Egg white milk custard

This is the first dessert that I made after I came back from Hong Kong. I had this dessert in Hong Kong at 聰嫂星級甜品店 and I love it very much. I think it is easy to make and I think my friends will love it too!


Serves 8-10
Ingredients of milk custard layer 
6 large egg whites (180ml)
6tsp condensed milk
690ml milk

Directions
Mixed all ingredients together. 
Pour into container through a sieve.
Cover container with foil or cling wrap
Steam for 20-25mins (large container like mine). Steam about 15 minutes if you use smaller individual ramekins or bowls.
Cool down and put in fridge.

Ingredients for Mango milkshake layer
1 cup mango purée
2 scoops of mango or vanilla ice cream
Some mango chunks for decorations

Directions
Blend mango purée and ice cream together.
Pour on top of cold steamed milk custard layer.
Refrigerate for 3 hours before serving. Serve cold.


Sunday, 21 July 2013

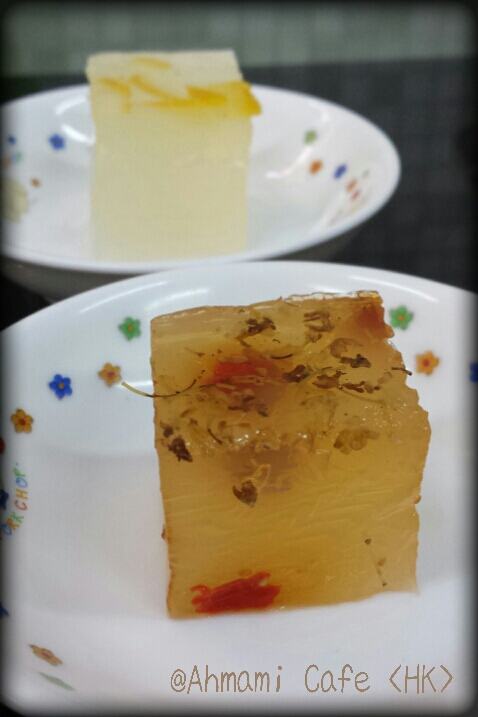
桂花杞子大菜糕(Osmanthus Goji Berry) /柚子蜜(Honey Citron)大菜糕 Agar agar jelly

I want to try this dessert long time ago. I know there is Agar agar powder for sale. But I always want to use the natural Agar agar to make the dessert. This is the first time I saw and bought natural Agar agar. I also found 桂花糖as well. I decided to make 桂花杞子大菜糕和柚子蜜大菜two kind of flavors. The agar agar that I bought is 30g and it can make 10-13 cups of jellies (the amount is adjust to the texture you like to have) . It is quite a lot. I decided to make 2 flavors.

  Ingredient:
Agar agar 30g
Water 10 cups (adjustable to your prefer texture)
Sugar 300g
桂花糖 (Osmanthus sugar) 2Tbsp &杞子(Goji Berry-Lycium Barbarum or Wolfberry) 2Tbsp
柚子蜜 Honey Citron Tea 3Tbsp


Directions
  1.  Soak agar agar in cold water for 15 mintues. Soak 杞子 in hot water until soft.
  2. Boil 10 cups of water (you can add more water if you want more jello texture)
  3. Drain water and take agar agar out.
  4. Add sugar (according to taste) and agar agar to boiling water.
  5. Boil until all dissolved in water. 
  6. If you make two flavours, divided water to two equal parts.
  7. Keep one portion in pot and keep boiling. Add 桂花糖. Stir until all dissolved.
  8. Add 柚子蜜 to the other portion. Stir until all dissolved.
  9. Prepare pan or mould.
  10. For 桂花杞子大菜糕, Pour mixture to mould and add soaked 杞子.
  11. For 柚子蜜大菜糕, just pour the mixture to mould.
  12. Refrigerate it and serve.


Tuesday, 25 June 2013

Mango Sago Herbal Jelly served with Coconut sugar 椰糖芒果西米涼粉

In Hong Kong, I stay with my parents in law where the place has a huge garden full of fruit trees and plants. At the meantime, we have big harvest of mango and jackfruit. The mango is very sweet but small. It is time to make mango mango and mango desserts! The maids bought back Herbal Jelly from market recently. Also she said she has natural Coconut Sugar imported from her own country - Indonesia. This natural coconut sugar tastes so great for dessert or for cooking! Way better than the cane sugar or brown sugar.


Ingredients: (serve 8-10 people)
Sugar Syrup (boil 100ml water with 1 cup of sugar)
Herbal Jelly 5 cups (cut in small cube shape)
Sago (1 cup)
Mango x 3
Coconut milk 3 Tbsp or more to taste
Evaporated Milk 200ml

Directions:
Prepare Sago:
Soak Sago in water for 15 minutes.
Boil 4 cups of water. Drain sago and pour pre-soaked sago into boiling water. Turn off heat. Cover pot and stand for 20 minutes. Check sago for readiness. Drain Sago with cold water. Place sago in cold water until ready for use. (consume within the same day)

Prepare  Herbal Jelly:
Cut herbal jelly in small pieces. Mixed herbal jelly with sugar syrup.

To serve:
Drain Sago and put sago to herbal jelly sugar syrup. Add Mango. Pour evaporated milk and then cover with coconut milk. Sprinkle some coconut sugar on top of the dessert. Prepare more coconut sugar for serving. It can be added according to own taste (more sweetness).


Sunday, 28 April 2013

Mango Sago Sweet Soup 芒果西米露

Last night dinner gathering, my friend gave me two mangoes. What special about these mangoes? They were directly brought from Phillippine. Since her sister in law is flight crew, she always bring things back from other countries. The mangoes look greenish but they already riped! And they are so sweet and full of mango flavour that we cannot find anything close to it. What can I do with it in such a short time? Mango mousse or custard need to chill before serve. But I only have less than an hour to cook and serve. I decided to make this fast and easy dessert that my home already has the following ingredients:

(serve 8-10)
Mango 2
Sago 1 cup
Evaporated Milk 1 can
Milk 2 cups
Sugar syrup (optional—depend on sweetness of fruit)

Directions:
1. Boil water in saucepan. Cook sago in low heat for 15 mins. Stir occasionally. Drain with cold water. Set aside.
2. Mix evaporated milk and milk. Add Sago.
3. Add sugar syrup according to taste. (Since mangoes are sweet, my friends said no need to add extra sugar). It is really depend on the sweetness of your fruits.
4. Cut mango in small cubes.
5. Add mango cubes to sweet soup.
6. Serve cold.

You can always substitute mngo with other fruits like melon, watermelon etc. If you like coconut flavour, you can use coconut milk in this recipe too.

Monday, 22 April 2013

楊枝甘露 Mango, pomelo and sago sweet soup/drink


Recently I bought a case of Mango and they are very sweet! Most of my friends are Mango fans, last week I made Mango parfait and it was a great hit! This week, I decided to make this Mango, pomelo and Sago sweet soup/drink. This is a Hong Kong style dessert that serves cold. It is a great summer dessert.

I tried to research the recipe online but they don't have a unique recipe that I think is good. Some recipes use whipping cream, some uses coconut milk. I nearly forgot the taste of it so I asked my husband. He has a good taste bud on food detail. He said it should has a mango ice cream taste in it. I believe the recipe that use whipping cream is close. Well, why not just buy a tub of ice cream and give it a try! I add and taste and record the amount of ingredients that I put to make this dessert. Here is the recipe I came up with! Enjoy!

Serve 12
200g Sago
200g Chinese Pomelo ~1/2 pomelo
1kg Mango meats ~6-8pcs of mango
1L milk
250g mango ice-cream
1 can evaporated milk (370ml)

Directions:
1 Boil a pot of water, pour sago into boiling water and stir. Once water reboiled, turn off heat, cover and wait for 15 mins.
2 When sago turns transparent, drain and run under cold water. Set aside.
3 Cut 500g Mango into cubes.
4 Use a blender, pour milk, remaining mango and mango ice-cream into blender and blend until all mixed.
5 Put in refrigerator until serve.
6 Add any amount of sago, pomelo and mango cubes that you like when serve. Serve cold.